Showing posts with label Baking. Show all posts

Oct 16, 2012

Recipe - Berry Topped "Sun buns"

With all this waiting on my hands, I decided to bake.....again....now this baby has to arrive soon or I will continue to look this pregnant for a long time, even with the baby out ;)) These large yeast buns are an absolute killer on the scale of deliciousness, so I thought I'd share the recipe with you. Try them.....that's my advise!

Recipe - Berry Topped Sun buns (2 large buns)
Ingredients
Buns
50g yeast
2 teaspoons of Bicarbonate
150g Butter
5 dl Milk 
1 ½ cups of Sugar
1 teaspoon of Salt
2 teaspoons of Vanilla Sugar
teaspoons of Cardamom 
13-14 cups of White Flour

Vanilla Cream
1 egg
2 tablespoons of Sugar
tablespoons of of Maizena (corn starch)
2 cups of Milk
1 cup of Cream 
teaspoons of Vanilla Powder
tablespoons of Butter

Icing/Decoration
The icing is made from mixing water and powder sugar (be careful and test with a very small amount of water. I didn't write down the proportions I used), 3 cups of fresh Blueberries and Raspberries + 1 whisked egg.

Before baking in the oven
Directions
Crumble the yeast into a bowl. Melt the butter in a saucepan and then add milk and heat to max 37°C. Pour into the bowl with the yeast and stir until it has completely dissolved. 
Add sugar, salt, cardamom, vanilla sugar, bicarbonate and the flour. Knead the dough until smooth. Let rise under a towel for roughly 40 minutes. 

Mix all ingredients for the Vanilla Cream, except the butter, in a saucepan with a thick bottom. Heat while constantly whisking on medium heat. Take the pan away from the heat as soon as the first bubble appears, then take it off the stove and add the butter and whisk until it has melted. Let the cream cool down. 

Preheat oven to 200°C. 
Now split the dough in half and then form and flatten into two round buns,  about 1-2 cm's thick, on baking trays with baking paper. Whisk an egg and lightly brush onto the edges of the buns. Spread the Vanilla Cream on the roundels, but leave a border around the edges which is about 2 cm's wide (basically where you brushed the egg). Let rise for another 30 minutes then sprinkle the berries on top.
Bake in middle of oven for 15-20 minutes. Let cool on a rack. 
Stir together powder sugar and water and drizzle over the buns......and Voilaaaaa, your buns are ready to serve!

Enjoy ;p

xox

Aug 30, 2012

Sugar Buns - Recipe

A week ago or so, one of my aqaintances, who runs the Swedish blog "Loving and Living", posted a photo on Instagram of these amazingly yummy looking Sugar Buns that she had made and I asked her to share the recipe....which she kindly did!
Well, yesterday, as the rain poured down, I decided to give this recipe a try. Since it's in Swedish with some specific Swedish ingredients originally in it (Hjorthornssalt och Filmjölk ;)), I had to tweak it a bit and am happy to say that they turned out GREAT!! I also posted the photo of the result on my private Facebook page and on Instagram and also got requests to share the recipe...so with this in mind, I'm translating my tweaked version of the recipe into English for you here:


Sugar Buns (18-20 buns)
Ingredients
1/2 of a Yeast cube
200g Butter
2 cups of Milk
150g Greek Yoghurt
2 table spoons of Cream
1 cup of Sugar
2 teaspoons of Bicarbonate
1 teaspoons of Vanilla Sugar
A pinch of Salt
Ground Cardamom
9-10 cup of White Flour
1/2 an egg (for brushing)

For the coating
50g of melted Butter
2 cups of Sugar

Directions
Melt the butter on the stove. Add milk, yoghurt and cream and ensure it's body temperatured. Pour the fluid over the crumbled yeast in a baking mixer and stir until the yeast has dissolved. Add sugar, salt, cardamom, vanilla and bicarbonate and finally, mix in the flour. Once the ingredients are all mixed, leave it to beat in the mixer for about 10 more minutes. Leave it to rise for about 40 minutes.
Once done, split the dough into 18-20 pcs. and roll your buns into the desired shape. Leave to rise for another 40 minutes. Set the oven to 225-250 degrees (Celsius). Brush your buns lightly with egg and leave them to bake in the oven for about 8 minutes.
To coat the buns, leave them first on a cooling rack for about 5-10 minutes to avoid burning your fingers or having the buns fall apart ;)). Melt butter in a pan and put the sugar in a bowl. Brush the buns with butter, then roll them in the sugar (one by one) and you're all set! 

Absolutely delish!!!! Enjoy ;))

xox

Mar 18, 2012

My week of baking

This week, besides my business trip to Milan, has been aaaaall about baking. I can't remember ever baking so much in one single week. The reason? Well, at work we have a birthday baking list you can sign up for. This is optional, but once you are signed up, somebody bakes a cake for your birthday and then it's your turn to bake for the person whose birthday comes after yours. A great and fun idea!! 
Well, only one little "problem".......you see, I am signed up for two of these baking lists, one of my own department and one with the marketing department and guess what? The people I was baking for both had their birthday's in the same week ;)) On top of this, we had guests this weekend, so I wanted to make them and our landlords some cupcakes. All fun, but quite exhausting! Especially the cakes as they were baked in the evening and decorated only in the morning. Now I think I will have a baking-free few weeks to recover my baking energy =))

All though experimental, they all turned out pretty great, both in looks (all though not perfect ;)) and in taste, so I will share my recipes with you!


The 3-layered Chocolate Shock Birthday Cake
Ingredients, Cake
200g butter
3 cups of fine, brown sugar
2 tablespoons of vanilla essence
4 eggs
3 cups of milk
5 cups of flour
1.5 dl cocoa powder of good quality
3 teaspoons of baking powder

A pinch of salt
1 teaspoons of vanilla powder
1 teaspoon of ground ginger

200 g's of Dark Chocolate
Bread crumbs


Directions: Preheat the oven to 180 degrees Celsius. Beat butter and sugar and vanilla essence until creamy. Separate the eggs and stir in the yolks with the butter cream. Combine flour, cocoa powder,  baking powder,  vanilla powder,  ginger and salt. Gently fold the milk and flour mixture into the egg mixture. Melt the chocolate in a water bath or in the microwave and fold it gently into the batter. Beat the whites to a froth and fold them into the batter. Spread the batter evenly over three buttered and breaded cake molds with removable bottoms (I used a 24cm in diameter mold). Bake each one in middle of oven for about 15 minutes. Put them on a cooling rack.


Ingredients, Chocolate Mousse Filling
200g of good quality,  dark chocolate 
4 egg yolks 
5 dl's of cream
Directions: Stir in the egg yolks one by one. Stir carefully between each one. Melt the chocolate carefully in the microwave and let it cool down to NOT HOTTER THAN 65 degrees Celsius (otherwise the egg may coagulate). Let the batter cool down., Whip the cream. Not too hard. When done,  carefully stir everything together and put in the fridge for a couple of hours.
Once the cake foundation has cooled down, put the chocolate mousse in between each layer. Be careful as the cake itself is quite heavy so use moderate amounts and you might have to smooth the edges before putting on the exterior frosting ;))


Ingredients, Chocolate Frosting
200 g softened butter
5 dl's powder sugar
2 dl's of good quality cocoa powder
Directions: Mix all the ingredients together with an electrical mixer until smooth and properly blended. Put on and around the cake as desired.
When done, keep the cake refrideratored until it's time to serve! 
Voilaaaaaaa!


Sticky White Chocolate Cake
Ingredients, cake
400g of white chocolate
200g butter
2 cups of flour
3 eggs
2 1/2 cups of white sugar
2 tablespoons of dark rum


Directions: Preheat the oven to 175 degrees Celsius. Chop the chocolate into small pieces. Melt the butter in a pan. Remove from heat and add the chocolate while stirring until it melts. Beat the eggs and the sugar until fluffy. Stir in chocolate,  rum and flour. Pour the batter into a greased and breaded or "coconutted", 24cm in diameter mold with a removable bottom (I use grained coconut instead of bread crumbs to get a nicer flavor, but both woth fine ;)). Bake in the bottom of the oven for roughly 30 minutes. Please note that the cake should still be sticky inside! Allow the cake to cool on a cooling rack. 


Ingredients, Glazing
200g white chocolate
1/2 cups of cream
2 dl's powder sugar
Topping of your choice (I'm using fresh strawberries, raspberries, blueberries and lime and a little bit of powder sugar).
Directions, Glazing: Chop the chocolate. Boil the cream. Remove the cream from the heat and add the chocolate while stirring until it melts. Let the glazing solidify about 5-10 minutes in the refrigerator. Spread the glazing over cake and let it harden in the fridge. 


Apple and Cinnamon Cupcakes with Vanilla Cream Topping
Ingredients, 12 Cupcakes
Roughly 250g's of flour (I didn't really measure)
2 dl's of white sugar
1 table spoon of real Vanilla powder
1 egg
1 apple
0.5 teaspoons of bicarbonate
2.5 teaspoons baking powder
1 tablespoon of Cinnamon
0.5 dl's of of Sunflower oil
2 dl's of Milk


Directions: Pre-heat the oven to about 175 degrees. Chop the apple into small pieces. Blend all of the ingredients together with an electrical mixer until properly blended. Spoon the batter into 12 cupcake liners.
Bake in the oven for about 15 minutes.
Ingredients,  Vanilla topping (cheat version ;))
Swedish version: Marsankräm
English version: Instant Vanilla Pudding mix
Blend according to pack.
Looks very nice decorate with chopped nuts or cinnamon.


Enjoy and if you try them, let me know what you think!!
xox

Oct 23, 2011

Auf Wiedersehen, Schaffhausen!

So it's a fact.....I have moved out of our Schaffhausen apartment (Chris still has a few more days there;)) and on Friday, it is time for us to move into our new home in Essertines-sur-Rolle. Soooooo exciting!!!


Today I'm blogging from the train back to Rolle. I am extremely tired.....tired but happy! Yesterday we had our moving out party and all though it's always sad to say goodbye, in a way it was also a great feeling to realize that the room was filled with people we will be seeing again, so it's not really goodbyes after all........this may sound like an "Well of course it's not a goodbye" to some of you, but you see, when you are an expat (or let's call it a "non-local" "non-permanent resident"), you simply can't always take that for granted....


We had a nautical theme and we spend the whole Friday evening and Saturday preparing. It was soooo much fun!!! Here some pictures to give you a flavor!
I baked some marine themed cookies
....and put them on "a beach" (well, it was brown sugar and cocoa powder ;))
....and I also baked some Cupcakes (of course)!!!


Can you find Nemo? ;)

Setting the scene.....one last time in Schaffhausen
We were "Popeye"
....and Olive =)
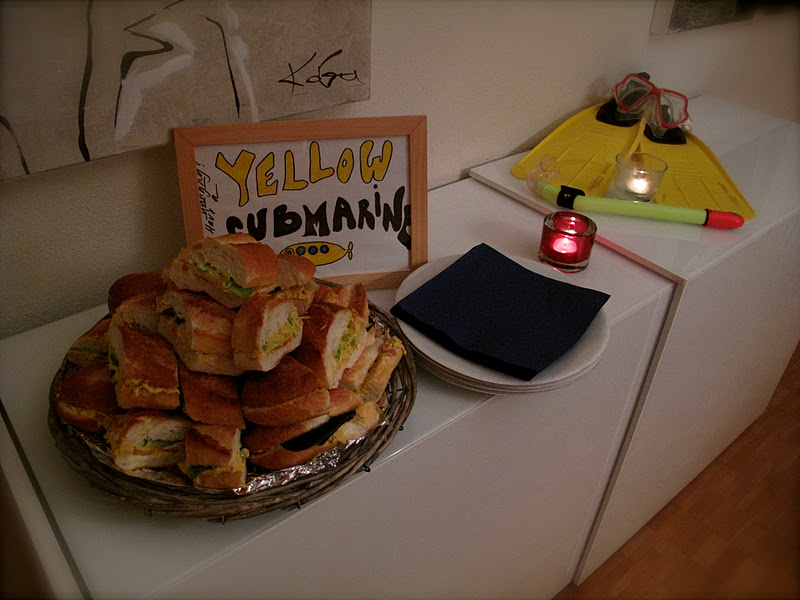
Sub's.....but these were special Yellow Submarines ;)

"A beer anyone?"
Mingling
.....like out of a movie =))
Some great, not drunken, sailors ;)
.....and the evenings Theme Quiz
I hope you all had a lovely weekend!
xox